Cathy Pountney - Visual Foxpro Report Writer ... said:
Picture/ActiveX Bound controls
To add a picture to the report, select the Picture/ActiveX Bound Control button from the
Report Controls toolbar and click somewhere on the report. This inserts a small Picture object
at the position of the mouse. You can also use the same click, stretch, and release method used
with shapes to size the picture as you add it to the report. As soon as the Picture object is
added to the report, the Report Picture dialog shown in Figure 10 is displayed.
...
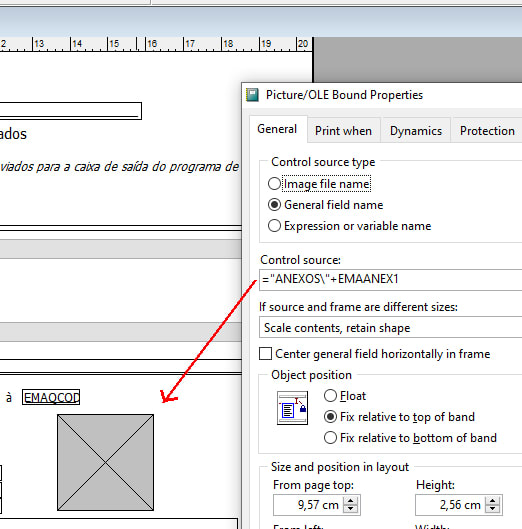
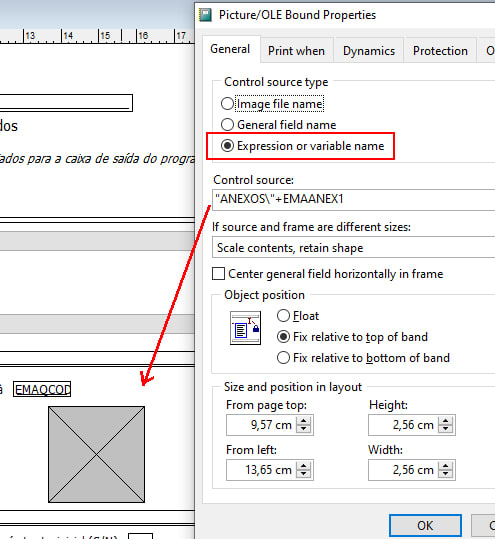
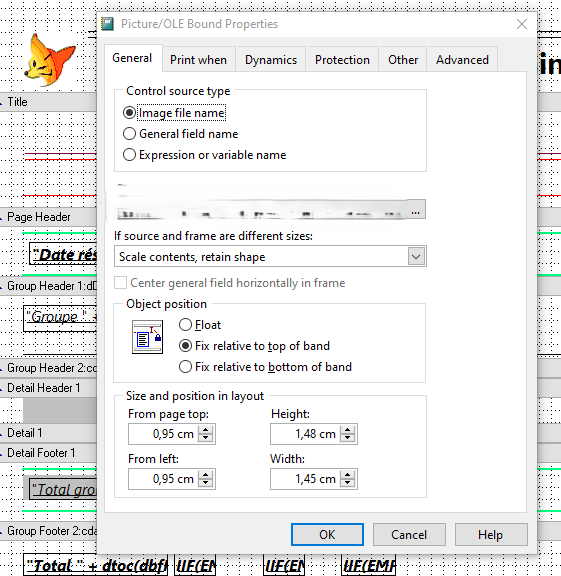
The first thing you need to describe to the Report Designer is where to get the picture.
This is done with the Picture from option group and either the File text box or the Field
text box.
Picture from File
The File option tells the VFP Report Writer that the picture is a physical file, such as
MyPicture.JPG. Depending on how your application is designed, you may need to qualify the
file name with a partial or full path. If the file resides in a directory that is within the current
VFP search path, you won’t need the path. However, if the file doesn’t reside within VFP’s
search path, you need to qualify the file name with enough path information for the Report
Writer to find the file.
You may also select the ellipse (…) button to the right of the File text box to invoke the
standard Open dialog. From this dialog, you can navigate to the directory that contains the
picture and select it. Upon returning from the Open dialog, the File text box contains the name
of the file you selected—with the full path name.
It’s important to realize that only the minimum relative path needed to find
the file is saved with the report. The full path is only displayed in the text box
for your benefit.
Besides entering a file name in the File text box, you may also enter an expression that
returns the file name of the picture to print. This is a very powerful feature! Consider the
following situation.
You have an inventory table with hundreds of items. You have pictures to associate with
each of the items in the table. Sometimes, the same picture is used for several items. For
example, you have a widget that comes in red, white, and blue. The item exists in the
inventory table three times because the part number varies depending on the color. But you
only have one picture that shows all three widgets. You could design the Inventory table with
a General field and use APPEND GENERAL to insert the picture into each and every
Inventory item, but this would result in a lot of wasted space when the same picture is used for
multiple items.
A better approach is to leave the pictures as stand-alone files. In your inventory table, add
a field called PictureFile as a character or memo field. What is stored in this field is the name
(and path if necessary) of the picture that relates to this item. The picture itself is not stored in
the Inventory table. When you add the Picture object to the report, enter Inventory.PictureFile
in the File text box. Once the file name is obtained from the expression, the Report Writer
continues in its normal fashion looking for the file and printing it on the report.
[highlight #8AE234]Note: A common mistake when implementing this scenario is to enter
Inventory.PictureFile in the Field text box instead of the File text box. But
you have to realize that the picture itself is not contained in a field. It’s
contained in a stand-alone file and you’re just using an expression, which
happens to use a field, to point to the file.[/highlight]
Another example of when to use an expression is when you have to conditionally print a
picture. For example, assume your application is a multi-company application that prints
invoices. The company logo that prints at the top of the invoice differs based on which
company the particular invoice is for. For this situation, you can use an IIF() function to
determine which file to print, as shown here:
IIF(Invoice.Company = 'A', 'LogoA.JPG', 'LogoB.JPG')
If there are too many possibilities that make an IIF() function too complex, use a UDF or
method call to return the appropriate file name as shown here:
oApp.CompanyLogo(Invoice.Company)
Either of these examples tells the VFP Report Writer to evaluate the expression and print
the picture whose file name is returned by the expression. So, like I said previously, being able
to enter an expression for the file name is a very powerful feature!
Sorry! The ability to enter an expression for the file name is a feature
that was added to Visual FoxPro. Older FoxPro 2.x applications can’t
use this trick.
Picture from Field
The Field option tells the VFP Report Writer that the picture is stored within a General field in
a VFP table. The Report Writer extracts the picture file from the indicated field and prints it on
the report. If you’ve never used general fields to store pictures, don’t worry. It’s really easy.
Use the following code to create a table and add a few records with pictures.
CREATE TABLE Test (pk I, MyPicture G)
INSERT INTO Test (pk) VALUE (1)
APPEND GENERAL MyPicture FROM c:\pictures\LogoA.JPG
INSERT INTO Test (pk) VALUE (2)
APPEND GENERAL MyPicture FROM c:\pictures\LogoB.JPG
The picture files you append into the general fields still have to be one of the supported
formats of BMP, JPG, or ICO. Or do they? Hmmm…
This is where the ActiveX... er... I mean the OLE Bound stuff comes into play. What
happens if you append a Microsoft Word document or Excel spreadsheet into the general
field? As long as you have the associated application installed, the document prints on the
VFP Report. Now that is really cool! Think of the possibilities. However, keep in mind it only
prints within the area defined for the Picture object. So a multi-page Word document won’t
print in its entirety without you pulling some major tricks to break the document down into
separate documents appended into separate records.
The Picture Frame
There are three options in the “If picture and frame are different sizes” option group (see
Figure 10). These options allow you to tell the VFP Report Writer what to do when the size of
the picture does not match the size of the Picture object (frame) you placed on the report.
• Clip picture: This option tells the VFP Report Writer to position the upper left
corner of the picture in the frame and to chop off any portion of the picture that
extends beyond the right and bottom edges of the frame.
• Scale picture, retain shape: This option tells the VFP Report Writer to expand or
shrink the picture so that it fills the frame. However, it will retain the proportional
height and width of the picture, and thus, the original dimensions of the frame may
be changed.
• Scale picture, fill the frame: This option tells the VFP Report Writer to expand or
shrink the picture so that it fills the frame both horizontally and vertically. Because
the ratio between the height and width of the picture is probably different from the
ratio between the height and width of the frame, the picture may become distorted.
Center Picture
OLE objects that come from general fields of a table can vary in shape and size. By default,
the object is anchored in the upper left corner of the frame. Check the Center Picture check
box to center the object within the frame you’ve designed. This option is only available for
Picture from Fields, not Files.


![[2thumbsup]](/data/assets/smilies/2thumbsup.gif "[2thumbsup] [2thumbsup]")
![[santa3]](/data/assets/smilies/santa3.gif "[santa3] [santa3]")
")